Sign In
Close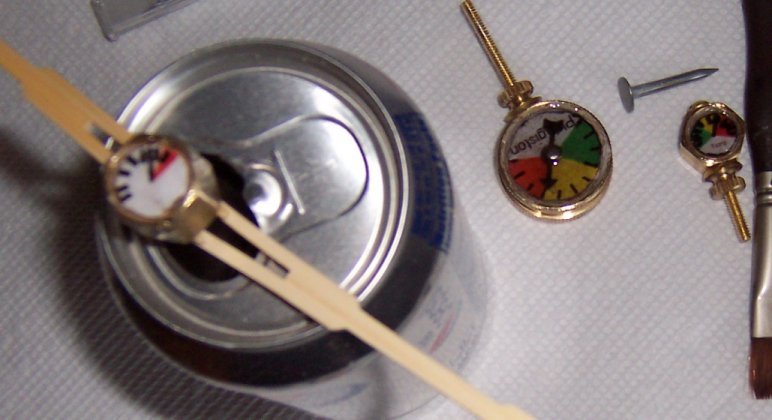
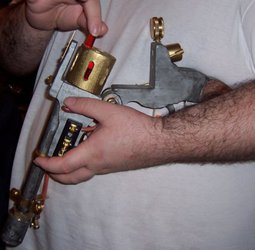
Since they weren't that visible in the photos of the constructed gun, here's a few of the gauges while the epoxy was drying.
The one propped atop the pop can there is one of the two hinge pins.
The large one to the left of the nail is attached to the brass tubing to the rear of the pistol, reads "Phlogiston", and is the only one in which the needle is not simply drawn in.
The small one under the nail is the one that (should be) attached via tubing to the CO2 cartridge and reads "Temp"
The gauges were made using instructions from: http://www.bruteforceleather.com/store/Scripts/prodView.asp?idproduct=437
Submission Information
- Views:
- 387
- Comments:
- 4
- Favorites:
- 0
- Rating:
- General
- Category:
- Visual / Crafts / Jewelry
Comments
-

-

Hey there! Sorry for the delay in responding -- past couple weeks were hectic prepping for AC.
Yep, I made the faces in an ancient copy of Paint Shop Pro, then printed them out but you can hand-draw them as well. I got the method from Brute Force Studios/Thomas Willeford's book "Steampunk Gear, Gadgets, and Gizmos". Short short version:
Pack the back of the gauge exterior with clay to act as a filler up to the level you want your face at. Set in the face and needles (presuming an actual needle rather than just drawn on, as with the smaller two in that photo). Then mix up a batch of clear epoxy and carefully pour it over until flush with the top edge of the gauge.
-
-
Thanks for the info. I plan to use a piece of flattened pvc pipe for my guage face. I just need to figure out how to design the face without it looking like a 4 year old drew it.
-
No problem :) Let me know how it turns out!
-
Link
archeopterix2680
How do you make these? Do you just draw the faces? I've figured out i can make the cases and needles but I'd like to be able to do custom guage faces.