Sign In
Close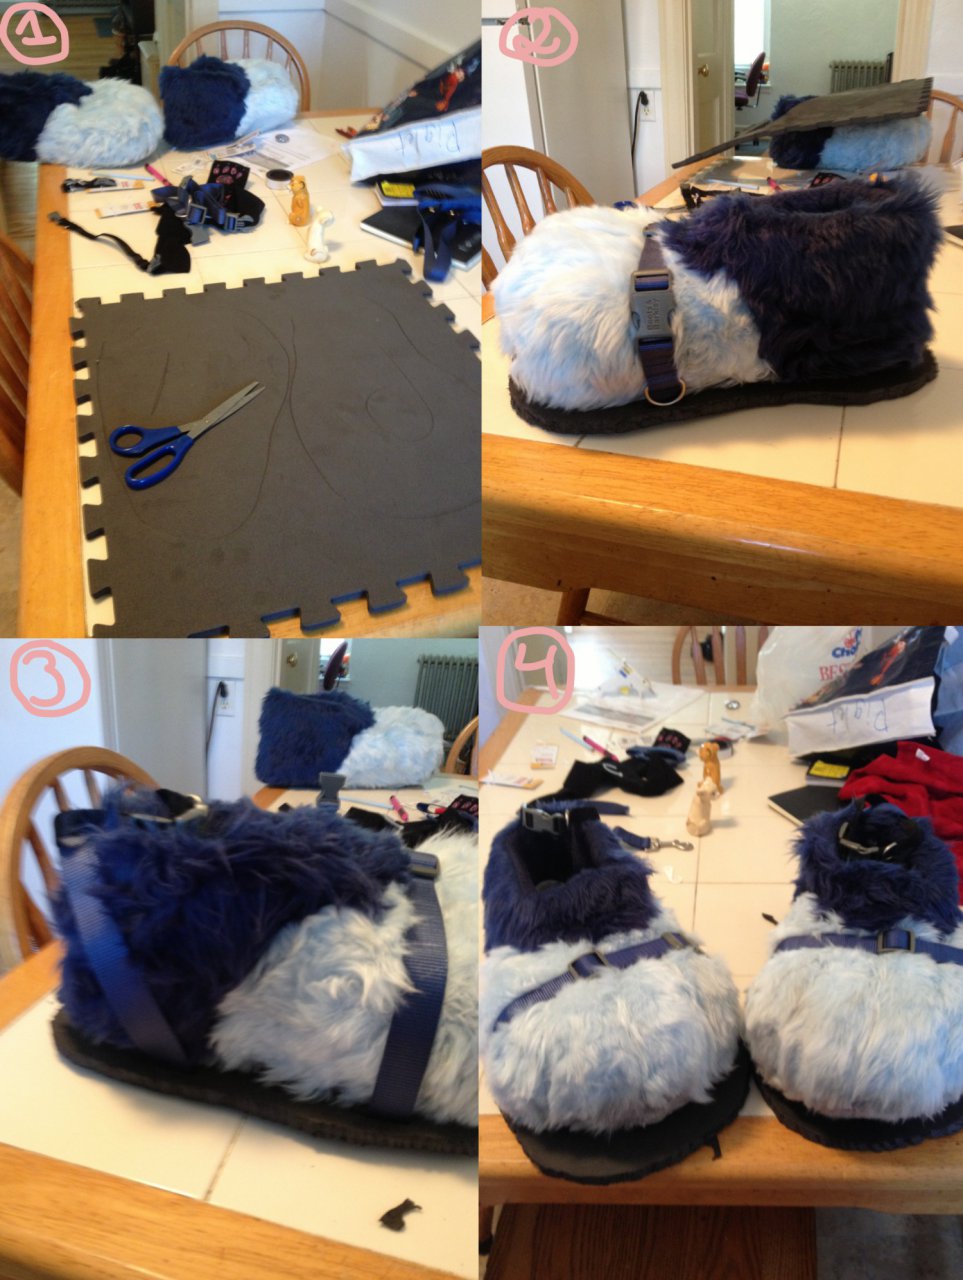


Nisha badly needed a pair of footpaw sandals, after all I can only keep cleaning her feet bottoms so many times before it gets ridiculous. I showed them off on Twitter but felt like it might be helped if I showed somewhat how I did them.
This was modified somewhat from the way Timduru made footpaw sandals here fursuit.timduru.org/sandals/. This doesn't involve any sewing or rivet guns, and while it's tad more expensive they should last you a good long while, and you will have some supplies left over to make new ones if need be.
WALL O TEXT WARNING STARTS HERE
1) Laying out all the materials. You're going to need:
-feetpaws (well duh XD)
-Anti-fatigue flooring or a yoga/exercise mat (mine here is an interlocking exercise foam mat)
-Two large dog collars with buckles
-A large leash or at least 2 yards of any color nylon strapping (at least an inch wide)
-Two small dog or cat collars with buckles
-Scissors and an Xacto knife or other super sharp cutting tool
-Hot glue gun
-Pencil
-Heat source
-Flex Seal (optional but can't hurt)
Start by tracing each footpaw on the mat. Leave about a half an inch around your paw. You might need one pad per paw but I got lucky sine Nisha's paws are small and was able to fit two on the one square I had. Can't hurt to also label them for which paw they are for. Then use your Xacto knife to cut it out (I actually used a steak knife cuz I couldn't find mine...^^;) and line it up under your paw to check the fit.
2) The large collars are going to fit and hold best right where your paw's toes meet the top of the foot, where the bridge would be on your own foot. Using your Xacto knife cut two slits in the mat and cut enough of an opening for the buckle to fit through. Then take the "male" part of the buckle (the part that goes in) and push it through the foam mat so the nylon strap goes against the bottom of the sandal. Push it through the other side and adjust the strap's length so it fits tight against the footpaw but not so tight that you can't buckle them. Do this on the other paw but make sure the buckles are on opposite sides or they'll rub against each other as you walk.
3) You're going to follow almost the same process here. Using the leash or nylon strap you've cut, you're going to make a strap to hold the heel of the paw in place. This time though, only the ends of the straps will be on the bottom of the sole, while the whole strap should be on top. Use your heat source to seal off the ends of the nylon where you cut it, or it will fray and possibly break. You can use a lighter, a match anything (I turned my stove on and carefully held it over the burner). Don't touch the ends right away after heating them!
Once they've cooled thread them back through the slits you've made and check the fit again. If you're happy with the fit fire your glue gun and glue down the ends on the sole. Apply some pressure, then let dry. Do this to the other paw.
4) Looking pretty good! Last step is to take the small collar and adjust them so they will fit around your ankle. Clip them around the strap in the back and try your new sandals on!
Optional: Once everything has dried and you're happy with how they look, take your paws out, flip the sandals over and cover the bottoms with a layer of Flex Seal. The rubber sealant will help keep the strap ends in place, but also help protect the foam from wearing away. Make sure that if you do use the stuff, do it outside. It STINKS, and if your area isn't well-ventilated, it'll be in your house for hours (/personal experience cough cough)
And that's it! Total cost was around $28 for the pair. The mat itself was about $24, but since I only used one piece it was more like $6. The extra cash came from having the collars/leash. I got everything at Target.
I hope this helps some folks out there.
Submission Information
- Views:
- 660
- Comments:
- 0
- Favorites:
- 2
- Rating:
- General
- Category:
- Visual / Crafts / Jewelry