Sign In
Close
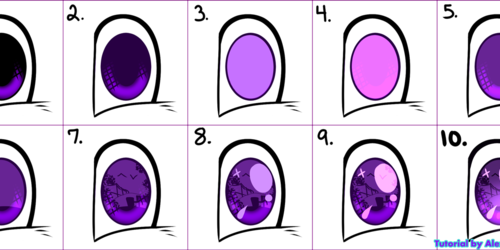

This is a really easy tutorial. Literally all you do is draw lines, then connect them to other lines. That's it. Haha. And you can do this for traditional art too.
It's very time-consuming but definitely worth the outcome!
I usually do this on hair, chest floofs, and tails. Places where there's thick fur.
Submission Information
- Views:
- 683
- Comments:
- 8
- Favorites:
- 10
- Rating:
- General
- Category:
- Visual / Digital
Comments
-

-

I think I was quite clear about it. It's for drawing fur or hair.
-
I hope Alex_Dachshund doesn't mind me hopping it, but this is a way to get that nice, fluffy look in pictures. Basically, you take each of those little boxes you made, then shade and highlight individually. It gives a furred look.
https://www.weasyl.com/submission/1206771/der-wahnsinn
There's a picture Alex did. You can see the technique in the chest fluff and tail pretty well, as well as minorly in the elbow and cheek fluffs. :)
-
Makes a lot more sense now. Thanks.
-
While this technique does look good, it's also pretty unnatural since fur doesn't fall that way. If you're drawing fur, the first 3 steps are fine
-
-
-
-

Pretty cool! Thanks for sharing :3
Link
No Fun Intended
I'm a bit confused. Do you mind me asking what you're supposed to do with this technique?