Sign In
CloseHorn Mold Tutorial by KikoJaharo
This is a basic tutorial that will give you the general idea of how to make a glove mold for horns. The pictures aren't very good, and I glaze over some steps, but I'll make a more detailed one on the next set of horns I cast. Make sure you read and follow ALL of the instructions and safety precautions included with the casting supplies. Use gloves always, work in a well-ventilated area, and use a respirator if required by the MSDS. You can find the supplies I use and more detailed tutorials on Smooth-on's website: http://www.smooth-on.com/
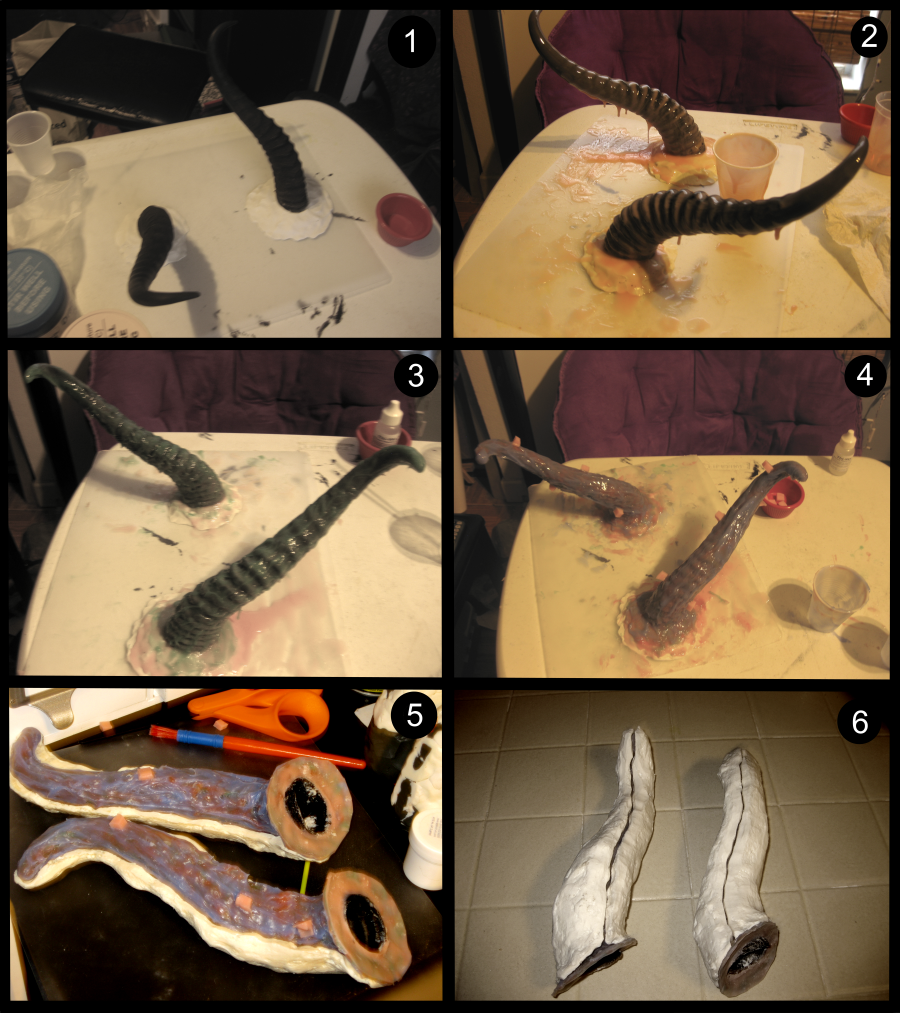
Set up your work area, and protect your work surface if necessary. You can cast horns right off the skull plate, but the horns I'm using (springbok) are set at a very low angle that would be difficult to work with, so I removed them from the skull plate and set them into some sulfur-free clay. Either way, you want to anchor your horns to your work surface. Spray your horns with mold release, following the directions.
Mix your first layer of silicone (I'm using Dragon Skin) and add a pigment that contrasts the color of the horns. You want the layer to be thin to make sure you capture all the details. This is the most important layer, so make sure to not get any bubbles; put on gloves and spread it into all the details. Pour the extra silicone into a cup, and cut them into keys once it's completely cured for later. (Step 4)
When the first layer is dry, but still tacky, put on the next layer in a contrasting color, to help make sure you cover all the spots. You can use silicone thickener (Thi-Vex) to help build the layers up faster. Repeat this until you're happy with the thickness of your mold, adding layers before the previous is completely dry, and using contrast colors in between.
Plan where you're going to put the seam for the mother mold. It should go over the highest points so it's easy to remove. During your final layer, place your keys into the wet silicone, away from where the mother mold seam is going to be. Let the mold cure completely.
Build the first half of your mother mold. You can use plaster bandages, but Plati-paste gives a more durable, lightweight mold. If you're using Plasti-paste, SPRAY EVERYTHING WITH MOLD RELEASE! It is very sticky. I recommend brushing Sonite Wax on everything, followed by two coats of mold release. Once it's dry, cut it down to make it easy to remove from the mold, and sand away any sharp edges that bother you. It doesn’t have to be pretty; the mother mold is just there to support the silicone so it doesn’t flop around while you're trying to cast.
Put the first half of the mother mold back onto the mold, and SPRAY EVERYTHING WITH MOLD RELEASE! If the second half of the mother mold sticks to the first, you will NOT get them back apart, so use plenty of Sonite Wax and mold release, focusing on the seam and first half of the mother mold. Once the second half cures, sand and shape it to your desire. You'll need to make something to hold the two halfs of the mother mold together when you're casting; you can use rubber bands, but I like to sew a strip of elastic into a loop, so I can have a perfect fit. Once this is done, take off the mother mold, invert the silicone mold to get out your horns, and put everything back together, using the keys as a guide. You're ready to cast horns! (next tutorial)
Submission Information
- Views:
- 715
- Comments:
- 0
- Favorites:
- 1
- Rating:
- General
- Category:
- Visual / Other


