Sign In
Close

Alright, this is a continuation from the Ken Sugimori Paint Tool Sai brushes I created.
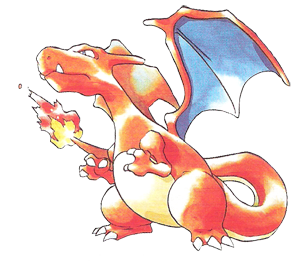
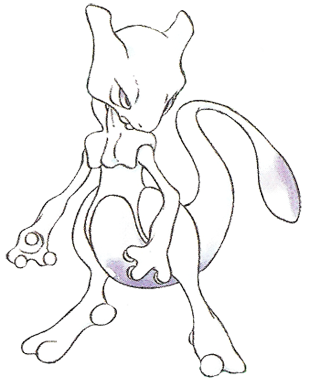
I really dig the old style Pokemon art by Ken Sugimori.
You know, the really watercolor-y looking style?
Something that calls back to this for example:
http://pldh.net/media/pokemon/ken_sugimori/original/006.png
http://pldh.net/media/pokemon/ken_sugimori/original/150.png
http://pldh.net/media/pokemon/ken_sugimori/original/149.png
I really wanted to imitate it, so I made some Sai brushes and a tutorial that can!
If you need the brushes, please refer back to the previous submission:
https://www.weasyl.com/submission/740654/old-style-ken-sugimori-brushes
HERE'S HOW TO DO IT!
Basically, you need some understanding of Paint Tool Sai to do this.
You need to know how layers work, and how layer modes work as well.
It also HELPS to have references of his work while doing this!
STEP 1:
Sketch. It does not matter what you sketch with.
STEP 2:
Make a new layer above your sketch.
Start inking with the Ken Sugimori pen that you made previously.
STEP 3:
Make a new layer BELOW your inks, but above your sketch layer.
Hide the sketch layer. You won't need it anymore.
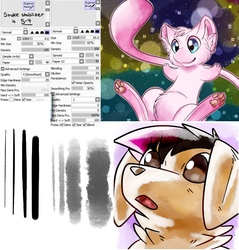
Choose a simple base color and color! I chose a pinkish white for Mew here.
STEP 4:
Click "Preserve Opacity" on your color layer after you put down the base color.
That allows you to color ONLY ON the colors you put down.
Then, using the Sugimori Brush, start adding detail colors.
Set layer texture to "Canvas". And layer effect to "Fringe" (around 2-4 fringe level is fine).
STEP 5:
Make a new layer above your color layer.
Click "Clipping Group". Change layer mode to "Multiply".
Start shading! Do NOT shade with black, but use an off-color. For Mew, I used a dark magenta.
Adjust the opacity of the shading to however dark you want it.
After you're done, set layer texture to "Canvas". And layer effect to "Fringe" (around 2-4 fringe level is fine).
STEP 6:
Make a new layer above your shading layer.
Click "Clipping Group". Change layer mode to "Multiply".
Shade some areas where it would be darkest, so adjust the opacity to slightly more darker than your original shading opacity on the previous layer.
(For Mew, I did this slightly on the tail, the eyes, between his legs, and underneath his head)
After you're done, set layer texture to "Canvas". And layer effect to "Fringe" (around 2-4 fringe level is fine).
STEP 7:
Make a new layer above your shading layers.
Click "Clipping Group". Change layer mode to "Luminosity". Leave at 100% opacity.
Pick white, and shade the highlights for the eyes.
After you're done, set layer texture to "Canvas". And layer effect to "Fringe" (around 2-4 fringe level is fine).
STEP 8:
Make a new layer above the eye shine layer you just did.
Click "Clipping Group". Change layer mode to "Luminosity". Adjust the opacity to something a little less brighter.
Pick white, and shade do a bit more highlights for the eyes (and other things like pawpads).
After you're done, set layer texture to "Canvas". And layer effect to "Fringe" (around 2-4 fringe level is fine).
STEP 9:
Make a new layer ABOVE all your other layers.
Simply add the eye dots!
After you're done, set layer texture to "Canvas". And layer effect to "Fringe" (around 2-4 fringe level is fine).
STEP 10:
FINAL STEP YAY
Make a new layer underneath your lineart layer, BUT ON TOP OF your other shading layers.
With white, do some drastic highlights on the body. For Mew, I did it on the tip of his tail.
After you're done, set layer texture to "Canvas". And layer effect to "Fringe" (around 2-4 fringe level is fine).
OPTIONALLY, you can put a stock texture on top of the image for added effect (just set the texture layer mode to "Overlay" and adjust opacity as needed)
For Mew, I used this one: http://fc04.deviantart.net/fs46/f/2009/178/8/b/Cardboard_Texture_by_Hjoranna.jpg
So there ya go! I hope you find it useful! Remember, feel free to play around and see what works best for you :)
Submission Information
- Views:
- 5079
- Comments:
- 0
- Favorites:
- 7
- Rating:
- General
- Category:
- Visual / Digital